


Come scegliere uno switch di rete
Utilizzo con sistemi audio Yamaha
Configurazione Dante semplice
Ottimizzazione automatica per Dante — Basta solo collegare
È sufficiente collegarsi per ottimizzare per Dante; non sono necessarie conoscenze IT avanzate.
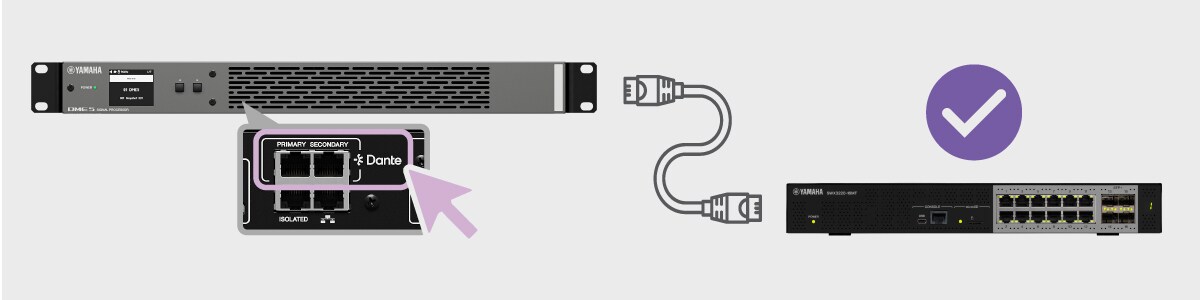
È sufficiente collegare i dispositivi audio Yamaha a uno switch di rete Yamaha con impostazioni predefinite di fabbrica per ottimizzare automaticamente le impostazioni per Dante. Le impostazioni richieste per Dante verranno applicate automaticamente, inclusi QoS, IGMP Snooping e la disattivazione di Flow Control ed Energy Efficient Ethernet (EEE), rendendo semplice la creazione di una rete audio stabile e affidabile.
Note
- Lo switch Yamaha deve essere nello stato predefinito di fabbrica.
- Lo switch e i dispositivi audio collegati devono essere modelli e versioni del firmware supportati.
Non ottimizzato automaticamente (configurazione manuale)
L’ottimizzazione automatica non è disponibile per configurazioni non supportate; tuttavia, le configurazioni non supportate possono comunque essere facilmente ottimizzate manualmente per Dante seguendo i passaggi riportati di seguito.
Caso 1: il firmware dello switch non è aggiornato:
Aggiornare il firmware dello switch alla versione più recente
Scaricare il firmware più recente per lo switch.
Avviare lo strumento di configurazione e gestione degli switch Yamaha LAN Monitor, connettersi allo switch e fare clic sul pulsante Aggiornamento firmware per aggiornare.
Dopo aver aggiornato il firmware, provare di nuovo l’ottimizzazione Dante automatica (descritta sopra).
Nota: si consiglia di utilizzare il firmware più recente, poiché include nuove funzionalità e correzioni di bug.

Caso 2: lo switch non è nello stato predefinito di fabbrica:
Facile da ottimizzare manualmente per Dante
Utilizzando lo strumento di configurazione e gestione degli switch Yamaha LAN Monitor, accedere alla Web GUI dello switch e selezionare “Dante” nelle impostazioni del profilo ProAV.
Questo applica automaticamente le impostazioni Dante, inclusi QoS, IGMP Snooping, la disattivazione del Flow Control e la disattivazione di Energy Efficient Ethernet (EEE).
*Quando uno switch è già stato configurato e non è nello stato predefinito di fabbrica, i dispositivi audio Yamaha non verranno ottimizzati automaticamente al momento della connessione.
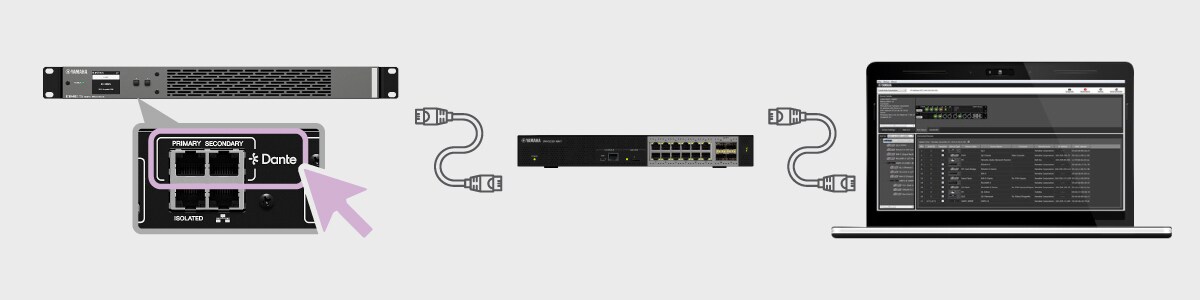
-
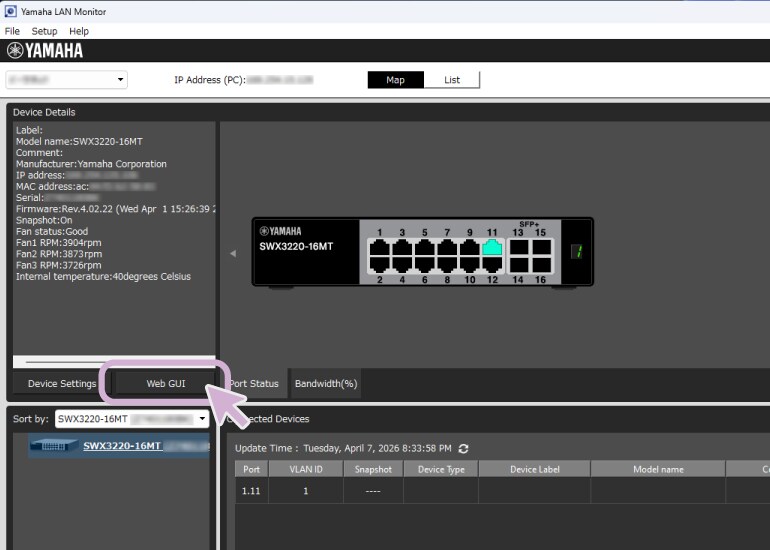
Passaggio 1. Avviare Yamaha LAN Monitor > Fare clic su “Web GUI”
-
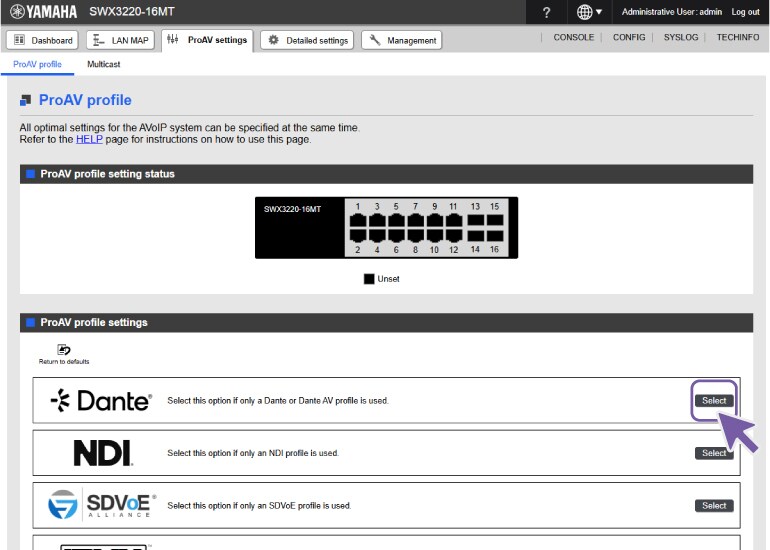
Passaggio 2: in Impostazioni ProAV, selezionare “Dante” e fare clic su Applica.
-
L’ottimizzazione Dante è completata!
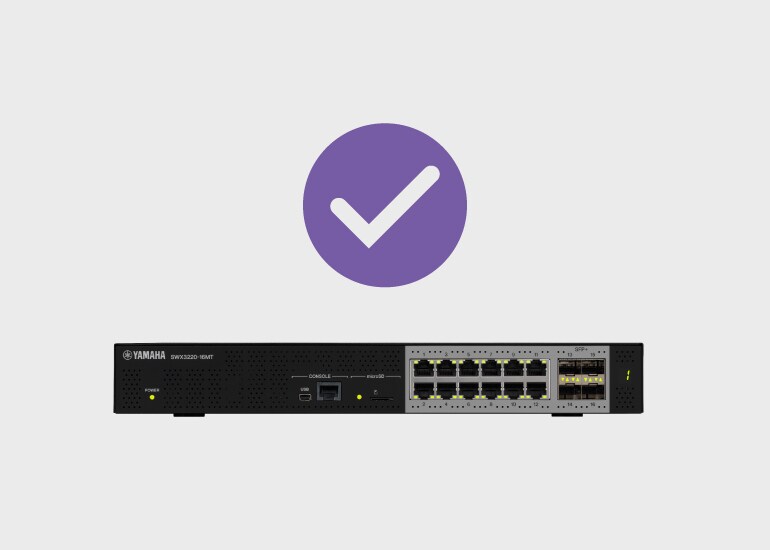
Scegliere lo switch giusto per le proprie esigenze
1. Verifica il numero di dispositivi che collegherai
Esempio: vuoi collegare otto dispositivi.
2. Verifica se questi dispositivi supportano PoE
Se non utilizzerai dispositivi PoE, vai al Passo 3
Se utilizzi dispositivi PoE, somma il fabbisogno di potenza di ciascun dispositivo.
Esempio: 15 W+15 W+15 W+15 W+15 W+0 W+0 W+0 W = Totale 75 W
Esempio: per otto dispositivi con un fabbisogno di potenza totale di 75 W, lo SWX2210P-10G (8 porte PoE, max 124 W) è la scelta migliore.
| Number of PoE ports | Managed switch (Maximum PoE Power Budget) |
|---|---|
| 24 | SWX2310P-28GT (370 W) |
| 8 | SWR2311P-10G (240 W) |
| SWX2210P-10G (124 W) |
3. Se etherCON non è necessario, selezionare dall’elenco seguente.
Esempio: per collegare otto dispositivi, lo SWR2310-10G sarebbe la scelta migliore.
| Number of Downlink ports | Managed switch |
|---|---|
| 24 | SWR2310-28GT |
| 16 | SWR2310-18GT |
| 8 | SWR2310-10G |
4. Se è richiesto etherCON (*Selezionare tra questi dispositivi quando si prevede una frequente riconnessione dei cavi, ad esempio nelle installazioni temporanee.)
La serie SWP2 è consigliata per configurazioni multi-switch.
La serie SWP1 è consigliata per configurazioni con un singolo switch.
*SMF e MMF nel numero di modello indicano il tipo di fibra ottica supportata. SMF supporta fino a 10 km, MMF fino a 300 m.
| Number of PoE ports | Number of Downlink ports | |
|---|---|---|
| 10G | 10 | SWP2-10SMF (Up to 10 Km Uplink connection) |
| SWP2-10MMF (Up to 300 m Uplink connection) | ||
| 1G | 16 | SWP1-16MMF (Up to 300 m Uplink connection) |
| 8 | SWP1-8MMF (Up to 300 m Uplink connection) | |
| SWP1-8 |
Elenco dei dispositivi che supportano la semplice ottimizzazione Dante (automatica)
| Category | Model name | Switch Firmware Version | Supported Yamaha Audio Devices | ||
|---|---|---|---|---|---|
| ADECIA | DME series | XMS series | |||
| RM-CR, RM-CG, RM-TT, RM-WAP, VXC2P, VXL1-16P | V3.1 or later | V3.1 or later | |||
| L3 managed |
SWX3220-30TCs | Rev.4.04.01 or later | Yes | Yes | Yes |
| SWX3220-16TMs | Rev.4.02.16 or later | Yes | Yes | Yes | |
| SWX3220-16MT | |||||
| L2 managed (RJ45) |
SWX2322P-30MC | Rev.2.08.01 or later | Yes | Yes | Yes |
| SWX2322P-16MT | Rev.2.06.16 or later | Yes | Yes | Yes | |
| SWX2320-16MT | Rev.2.05.16 or later | Yes | Yes | Yes | |
| SWX2310P-28GT | Rev.2.02.30 or later | Yes | Yes | Yes | |
| SWR2311P-10G | |||||
| SWR2310-28GT | Rev.2.04.17 or later | Yes | Yes | Yes | |
| SWR2310-18GT | |||||
| SWR2310-10G | |||||
| SWX2210P-10G | Rev.1.03.13 or later | Yes | Yes | Yes | |
| L2 managed (etherCON) |
SWP2-10MMF | Rev.2.03.21 or later | Yes | Yes | Yes |
| SWP2-10SMF | Not supported | Not supported | Not supported | Not supported | |
| SWP1-16MMF | Not supported | Not supported | Not supported | Not supported | |
| SWP1-8MMF | Not supported | Not supported | Not supported | Not supported | |
| SWP1-8 | Not supported | Not supported | Not supported | Not supported | |
| L2 unmanaged | SWR2100P-10G | Not supported | Not supported | Not supported | Not supported |
Elenco dei dispositivi che supportano la semplice ottimizzazione Dante (manuale)
| Category | Model name | Switch Firmware Version | ProAV profile |
|---|---|---|---|
| L3 managed |
SWX3220-30TCs | Rev.4.04.01 or later | Yes |
| SWX3220-16TMs | Rev.4.02.17 or later | Yes | |
| SWX3220-16MT | |||
| L2 managed (RJ45) |
SWX2322P-30MC | Rev.2.08.01 or later | Yes |
| SWX2322P-16MT | Rev.2.06.17 or later | Yes | |
| SWX2320-16MT | Rev.2.05.17 or later | Yes | |
| SWX2310P-28GT | Rev.2.02.31 or later | Yes | |
| SWR2311P-10G | |||
| SWR2310-28GT | Rev.2.04.18 or later | Yes | |
| SWR2310-18GT | |||
| SWR2310-10G | |||
| SWX2210P-10G | Rev.1.03.14 or later | Yes | |
| L2 managed (etherCON) |
SWP2-10MMF | No | No |
| SWP2-10SMF | |||
| SWP1-16MMF | Not supported | Not supported | |
| SWP1-8MMF | Not supported | Not supported | |
| SWP1-8 | Not supported | Not supported | |
| L2 unmanaged | SWR2100P-10G | Not supported | Not supported |
